
使用Typescript编写和发布npm包
匿名 · 更新于 2022/5/29
第一步 新建项目目录 my-ts-hi
第二步 初始化Git环境
在my-ts-hi目录下,运行 git init 命令
第三步 初始化 NPM 包
npm init # 或者使用, npm init -y 跳过所有提问 这里演示使用的后者
{
  "name": "my-ts-hi",
  "version": "1.0.0",
  "description": "",
  "main": "index.js",
  "scripts": {
    "test": "echo \"Error: no test specified\" && exit 1"
  },
  "keywords": [],
  "author": "",
  "license": "ISC"
}
第四步 安装依赖
安装 Typescript
# 使用 npm 安装 npm i typescript -D或使用 yarn 进行安装
yarn add typescript -D
方式一 手动创建配置 tsconfig.json文件,文件如下
{
  "compilerOptions": {
    "target": "es5",
    "module": "commonjs",
    "declaration": true,
    "outDir": "./dist",
    "strict": true
  }
}
# 需要全局安装 typescript包 npm install typescript -g tsc --init使用当前项目中的 typescript
./node_modules/.bin/tsc --init
配置完成tsconfig.json如下
{
  "compilerOptions": {
    "target": "es5", // 指定ECMAScript目标版本
    "module": "commonjs", // 指定模块化类型
    "declaration": true, // 生成 `.d.ts` 文件
    "outDir": "./dist", // 编译后生成的文件目录
    "strict": true // 开启严格的类型检测
  }
}
第五步 开始编码
在根目录下新建lib目录,在lib目录里新建index.ts文件,里边代码如下
// 非常简单的加法函数
export function add(a:number, b:number) : number {
  return a + b;
}
第六步 编译
将编译命令和发布命令添加到 package.json 文件中,并修改main, 增加types, 改动后的package.json文件内容如下
{
  "name": "my-ts-hi",
  "version": "1.0.0",
  "description": "",
  "main": "./dist/index.js",
  "types": "./dist/index.d.ts",
  "scripts": {
    "prepublish": "npm run build",
    "test": "mocha --reporter spec",
    "build": "tsc"
  },
  "keywords": [],
  "author": "",
  "license": "ISC",
  "devDependencies": {
    "chai": "^4.3.6",
    "mocha": "^10.0.0",
    "typescript": "^4.7.2"
  }
}
运行命令,执行编译
npm run build
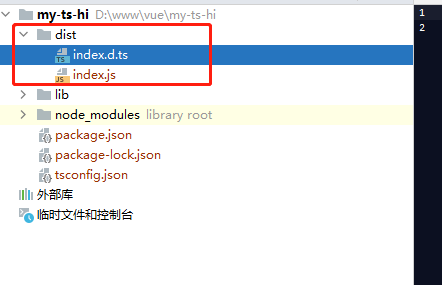
编译完成后,我们可以看到目录下出现了 dist 目录,在该目录下生成了两个文件,一个包含代码逻辑的 JS 文件,一个包含类型定义的 interface文件。
第七步 编写测试
1)安装测试框架和断言库
npm i mocha -D
npm i chai -D
# 根目录下
创建 test 目录, 然后在test目录下新建test.js
'use strict';
const expect = require('chai').expect;
const add = require('../dist/index').add;
describe('ts-hi function test', () => {
it('should return 2', () => {
const result = add(1, 1);
expect(result).to.equal(2);
});
});
修改package.json文件,添加测试脚本,修改后的package.json代码如下
{
  "name": "my-ts-hi",
  "version": "1.0.0",
  "description": "",
  "main": "index.js",
  "scripts": {
    "test": "mocha --reporter spec",
    "build": "tsc"
  },
  "keywords": [],
  "author": "",
  "license": "ISC",
  "devDependencies": {
    "typescript": "^4.7.2"
  }
}
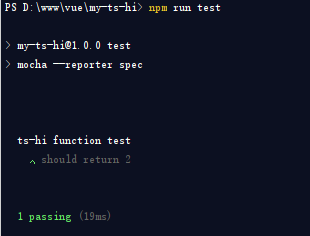
npm run test
第九步 添加 README
在根目录下创建README.md文件,在README.md文件内编写文档介绍...
第十步 提交 和 推送远端
创建 .gitignore 文件,并添加 node_modules/ 避免将node_modules 添加到版本控制中 git add . git commit -m "Initial release"
在发布代码之前,需要将一些没有必要的文件或目录从安装文件中排出。例如,lib文件目录。创建 .npmignore 文件。
.npmignore 文件内容如下:
# 排除 lib文件
lib/
登录 npm,并发布包
# 登录 npm, 若无账号,请在https://www.npmjs.com/ 注册账号 npm adduser Username: 你的npm用户名 Password: Email: (this IS public) 填写邮箱 Logged in as youthcity on https://registry.npmjs.org/.发布包
npm publish
如果包名是@用户名的私有仓库,需要付费,如果开源 需使用以下命令进行发布
npm publish --access public
原文转至:https://www.jianshu.com/p/8fa2c50720e4